
I love playing games more on my Windows PC than on my Android device, mainly due to the fact that I have access to a bigger screen and it’s easier to control on the PC. However, there are situations where you’d like to play PC games on Android devices – for instance games that aren’t available on Android and they’re only available through Steam.
There’s a way to do that, just like there’s a way to do pretty much anything these days. You can play Windows PC games on Android devices by using an emulator. One of the best available is the Mobox emulator – a powerful tool that’s turning smartphones into portable PC gaming machines – granted, only if your Android device has good enough specs. This tutorial will help you with the installation of Mobox on Android, configure it for optimal performance, and use it to play games.
What is the Mobox Emulator?
Mobox is an open-source emulation project that lets you run Windows PC games on your Android device. Built on top of tools like Wine (a compatibility layer for running Windows apps on non-Windows systems) and Box64 (which handles 64-bit x86 emulation on ARM devices), Mobox bridges the gap between your Android phone and the Windows gaming world. It’s particularly popular for fast performance and compatibility with high-end Snapdragon processors, making it the best choice in comparison with alternatives such as Winlator or Horizon-Emu.
What makes Mobox special? It’s not just about emulation – it’s about doing it well. With support for DirectX games and even a modified Steam client, Mobox delivers a surprisingly smooth experience, even for 3D titles like Crysis or 2D classics like Hollow Knight. It’s not very easy to install it, however with a bit of attention you can easily do it.
How to Install Mobox Emulator on Android
Installing Mobox isn’t as simple as downloading a single app from the Play Store, but with a little patience, you’ll have it running in no time. Here’s a step-by-step guide to get Mobox up and running on your Android device.
Mobox Emulator requirements:
- An Android device (Android 10 or higher recommended) with a Snapdragon processor (Adreno 6xx or 7xx GPU preferred for best results).
- At least 6GB of RAM (8-12GB is ideal for modern games).
- Around 128GB of free storage (more if you plan to install large games).
- A decent internet connection for downloading files.
How to install the Mobox Emulator
1. Install Termux:
Head to the Google Play Store or F-Droid and download Termux, a terminal emulator that Mobox relies on to function. This is your command-line hub for the setup process.
2. Install Termux-X11:
Next, grab Termux-X11, which provides a graphical interface for Mobox. You can find the APK on its official GitHub page: Termux-X11 APK. Just choose the latest version, download it on your smartphone and install it (you’ll need to enable installation from unknown sources).
3. Install Input Bridge:
This app handles controller and input mapping. Download the Input Bridge APK from its GitHub page or a trusted source, install it, and set it up later for your gamepad or touchscreen controls.
4. Set Up Termux:
Open Termux and update it by typing these commands:
pkg update
pkg upgrade -y
Grant it storage access with this command:
termux-setup-storageThese ensure Termux is current and has access to your device’s storage.
5. Install Mobox:
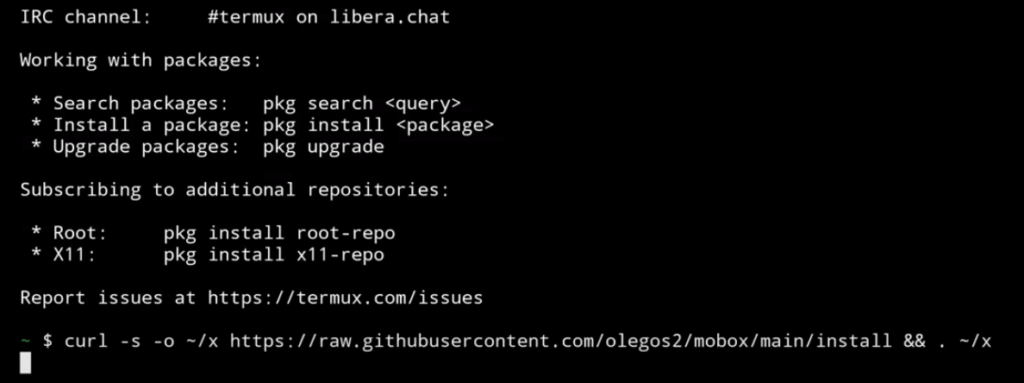
In Termux, type:
curl -s -o ~/x https://raw.githubusercontent.com/olegos2/mobox/main/install && . ~/x
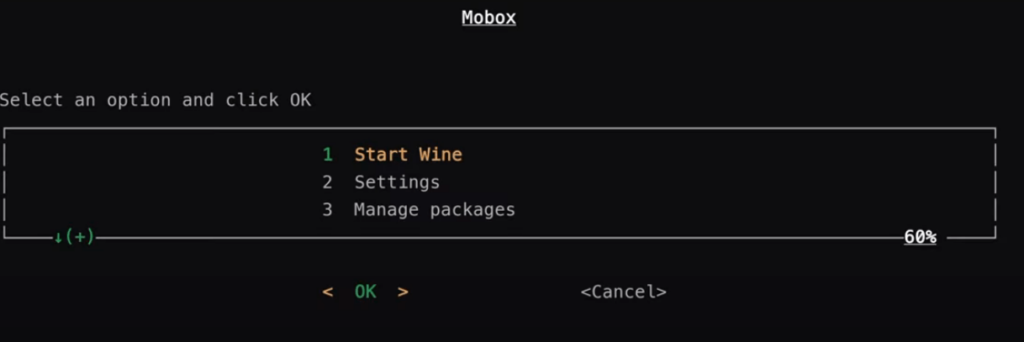
mobox6. Launch Mobox:
Once installed, type mobox again in Termux to start the emulator. You’ll see a menu – select “Start Wine” to boot up the Windows-like environment. Termux-X11 should pop up with a desktop interface.
That’s it! Mobox is now installed. It’s a bit technical, but once you’re in, the possibilities are endless.
Best Mobox settings for optimal performance
Mobox’s default settings work okay, but tweaking them can make a huge difference, especially for performance and stability. Here’s how to dial in the best experience based on your device.
In Termux, type mobox, then instead of hitting “Start Wine,” navigate to the “Settings” menu.
Recommended tweaks:
Dynarec Settings:
Go to “Dynarec Settings” and set the “Preset compatibility flag” to 455 for a balance of speed and stability. If you notice crashes, try 2 instead—it’s slower but more compatible with tricky games.
System Settings:
- Set “Primary Core Amount” to match your device’s CPU cores (e.g., 8 for most modern Snapdragon chips). This maximizes performance.
- If you have a Snapdragon 8 Gen 1 or 7+ Gen 2, enable the “A7xx flickering fix (TU_DEBUG)” option to reduce graphical glitches.
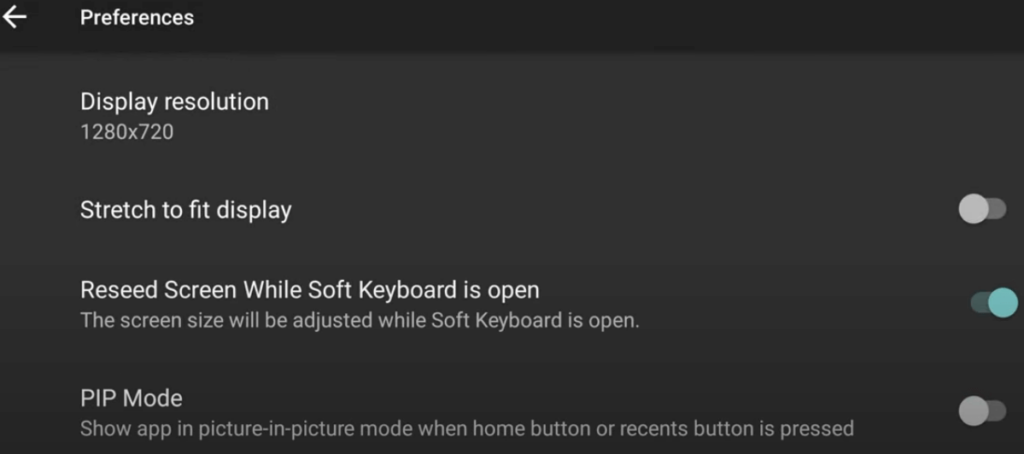
Resolution:
In Termux-X11 preferences, set “Display Resolution Mode” to “Exact” and choose a resolution like 1280×720 for lighter games or 1920×1080 for better visuals if your device can handle it.
Graphics Drivers:
Stick with Turnip+DXVK if you have an Adreno GPU—it’s optimized for Snapdragon chips. You can install these via the “Wine Start Menu” under “Manage Packages.”
Performance Tips:
- If RAM is tight, enable “OOM Adjuster” (requires root) to prevent Termux from being killed by Android’s memory management.
- Lower in-game graphics settings (e.g., set Crysis to low) to boost FPS.
These settings should give you solid frame rates – think 30+ FPS for 2D games and playable speeds for older 3D titles. Experimentation is key, as performance varies by device and game.
How to install games on Mobox
Now that Mobox is set up and tuned, it’s time to load some games! Here’s how to get them running.
Get Your Game Files:
You’ll need to get the games first – either from a DRM-free source like GOG or by copying files from a PC installation (avoid repacks like FitGirl, as they often stall during setup).
Transfer to Android:
Move the game installer (e.g., a .exe file or ISO) to your phone’s storage via USB or a file manager. Place it in an accessible folder like /sdcard/Downloads.
Install the Game:
- Launch Mobox via Termux (mobox > “Start Wine”).
- In the Termux-X11 desktop, navigate to the D: drive (your phone’s storage).
- Double-tap the installer and follow the prompts, just like on a PC. It’ll install to the Mobox container.
Run the Game:
After installation, find the game’s executable (e.g., game.exe) in the installation folder and double-tap to launch. Use Input Bridge to map controls if needed.
Installing Steam Games
Install Steam:
- Download the Steam installer from the official website on your phone.
- Run it in Mobox (D: drive > double-tap SteamSetup.exe). Uncheck “Run Steam” at the end of the install.
Add SteamExagear:
- Download the SteamExagear.7z file from a trusted source (e.g., a Google Drive link shared in emulation communities).
- Extract it to /sdcard/Downloads and copy the contents to your Mobox Steam folder (usually under C:/Program Files/Steam).
Launch Steam:
- Run Steam from the Mobox desktop. Log in (use a secondary account to avoid potential bans—Valve can be twitchy about emulation).
- Download and play your Steam library games as usual.
Note: Steam adds some overhead, so lighter games like Hollow Knight will run better than heavyweights like Cyberpunk 2077.
Mobox is a game-changer for Android emulation, offering unparalleled performance for PC gaming on the go. Sure, the setup process is a bit involved, and you’ll need a beefy Snapdragon-powered device to really shine, but the payoff is worth it. From retro 2D gems to early 3D classics, Mobox brings a slice of PC gaming magic to your pocket.
Have you tried Mobox yet? What games are you running? Drop your experiences—or any killer tips—in the comments below. Happy gaming, and stay geeky!